Menus and Roles
This screen is used to create a menu and assign applications to the menu. The Menu is then assigned to users in the Users screen so the use can accessed the desired application.
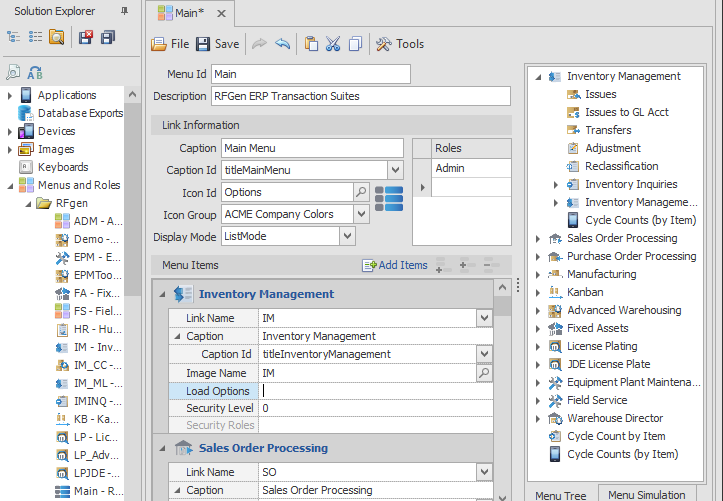
Link Information is a container for linking from a source or acting as a source for other functions.
Caption is the heading for the menu, and Caption ID is used for localization of the Caption if you have the Text Resource setup for it.
Icon Id can be left blank or used to assign an image that will display with the caption text.
Icon Groups is used to select the theme color for the icons in a menu.
Display Mode changes the menu list style so you can visualize the menu items in List mode or in the Default mode defined under themes. (Default formats are listed the Menu > ListStyle in Themes.)
Use the Add Items (top of menu bar) provides utilities to perform global searches, replacement and import/export tasks. For more details, see Menu Tools.
Menu Items
Link Name is the name of the application menu name.
Caption is the name that will show on the menu. Caption ID is the text resource id if you want the caption to be localized.
Image Name allows you to source the icon for your menu or application from the Images group in the Mobile Development Studio > Images.
Load Options is an optional entry for executing scripts or default values. For example, if the application has a value defined as "MoveType", the values related to "MoveType" will be loaded with the application when the user selects that application from the menu.
Security Level works off a range of values and must be coordinated with the Security Level setting for the User. the security levels are customizable and works as follows. If you setup security levels 0 to 3 for all menus with X, Y, Z apps, and assign Sam the user a security level 0 to 3, Sam will have access to the menus with apps X, Y, Z. But if you assigned Mary the user security level of 4 or higher, she will not have access to any menus with security levels 3 or lower.
Security Roles is an Optional field and is read only. If a security role (or roles) was setup in an application, then the Security Role value will display in this field. For more details, see the topic To Limit User Access to Menus.
The Menu Tree displays all your menus, submenus and applications linked to each menu.
The Menu Simulation view shows how your menus would look on screen or inside a device. For more details, see Menu Simulation.
Assign menus to user or user groups
Once the menus, submenus and applications are setup, you can assign the menus to user accounts in the Solution Explorer > Users tree. This helps control which Mobile Apps a user will can access on their mobile device or Windows desktop system.
For more details, see User Overview.
When testing your solution, the process generally begins with the Login app, then the menu and then the application selected in testing.
If you plan on testing using this path, a default user (i.e. Sam), menu and app (i.e. Login), and menu of other apps should be setup before you begin testing.
NOTE: The User Management Console also provides features that allows Console users to setup Menus and Users without providing Console users full access to everything on the server. This enables database updates from the server or the console by different users. For more details, refer to the User Management Console section in this guide.